Brown Paper Bag Baby Back Ribs
4 min read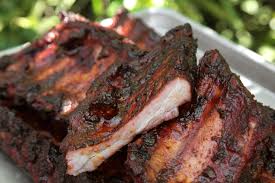
AUTHENTIC BARBECUED RIBS
Count on about four hours, from start to finish, for this process. Assemble the following:
A covered kettle grill. Although it doesn’t have to be a “kettle” grill, a covered grill is a necessity for this process. Break out your favorite charcoal grill and get ready.
Charcoal briquettes. For purposes of consistency, all cooking was done over premium-quality charcoal briquettes; if you prefer lump, natural charcoal, by all means use it, although it may affect cooking times slightly.
Hickory smoking chips. Hickory is absolutely the favored type of wood—use other types at your own risk.
Two slabs of pork spareribs, about 6 pounds total (serves about 4).
Your favorite dry rub
Your favorite barbecue sauce
Aluminum foil (extra-wide, heavy-duty, if you have it on hand).
A large brown paper bag.
1. Pick your ribs. Strangely, there’s not much disagreement here: Aficionados from all quarters seem to agree it’s the old-fashioned spareribs you want — not the baby back ribs, not the country-style ribs, just the plain old, under-three-pounds pork spareribs, in one big slab. (When I brought up the fact that other types of ribs were meatier, one knowledgeable friend quickly said, “But I don’t want my ribs meaty.”) If there is a large amount of extraneous fat on the ribs, trim it before cooking. The amount of fat trimmed from ribs varies, somewhat mysteriously, from one part of the country to another.
2. At least an hour before cooking the ribs, select your dry rub and rub a generous amount (a scant three tablespoons) onto each side of the ribs. The ribs can sit at room temperature for up to an hour; wrap them in plastic wrap and refrigerate if you plan to hold them any longer that. An hour is plenty of time for the dry rub to flavor the ribs. If you want the meat more intensely flavored, this step can be done the night before you plan on cooking.
3. Start with a grill that’s free of any leftover ashes or coals. Light forty or so charcoal briquettes (if you’re using one of those metal chimney starters, fill it approximately two-thirds full). Push all the coals to one side of the fire grate, arranged in a mound two or three briquettes high. Keep the bottom vents of the grill completely open. The coals will be just right when they are covered in a light gray ash. Meanwhile, wrap two large handfuls (about two cups) of hickory smoking chips in foil. Poke small holes in the top of the foil packet with a fork. Some folks swear by having a source of moisture inside the grill, most often an aluminum pan of water shoved up next to the coals. As much as this sounded like a good idea and seemed to make culinary sense, no discernible difference was noted each time it was tried. But since it doesn’t hurt, feel free to employ it, if desired.
4. Once the coals are ready, lay the foil-wrapped smoking chips on top of the charcoal. Put the cooking grate in place. Position the ribs on the cooking grate opposite the fire; on a twenty-two-inch kettle grill, you should be able to cook two full slabs of ribs, side by side, at one time. Put the lid on the grill, with the top vents two-thirds of the way open, directly over the ribs. This will help draw the heat and hickory smoke past the ribs. Initially, the heat inside the grill will probably hover around 350 degrees. Over the two-hour cooking period, it will drop a hundred degrees or so — all of which falls into the acceptable slow-cooking range.
5. Turn the ribs every thirty minutes for a total cooking time of two to three hours. There is no need to baste the ribs with anything, unless basting happens to be part of the way you learned how to cook ribs. In other words, basting doesn’t make much difference in the quality of the final product, but it doesn’t detract from the ribs, either. In all but the most extreme of weather conditions, the ribs will be done in two hours. In normal weather conditions (say, above 60 degrees) the coals will begin to lose some of their vigor toward the end of the cooking time. Don’t worry. They still produce enough heat to cook the ribs thoroughly.
In cold weather, prepare for a longer cooking time. Depending on just how cold it is, when you turn the ribs at the one and one-half hour point you’ll probably need to add an additional fifteen coals to keep the cooking temperature more or less constant. As a way of gauging how outside temperatures can affect cooking times.
Signs of doneness include the meat starting to pull away from the ribs (if you grab one end of an individual rib bone and twist it, the bone will actually turn a bit, separate from the meat) and a distinct rosy glow on the exterior.
6. If there is a secret to producing authentic barbecue-joint-style ribs at home, it is this step: Immediately after taking the ribs off the grill, completely wrap them in aluminum foil . Put the foil-wrapped ribs in a brown paper sack, and fold the sack over the ribs. Allow to rest at room temperature for one hour or more. Although it’s difficult to say exactly what happens inside that foil-wrapped, brown-paper-sacked package, whatever it is, is good. My unscientific guess is that the moist, enclosed heat allows some of the juices to return to the meat, further flavoring and tenderizing it.
7. Finally, heat up your favorite homemade or store-bought barbecue sauce, unwrap the ribs, swab on the sauce, chop into individual ribs, and then chomp. You may find yourself agreeing with a couple of folks in Kansas City on that cold and snowy night who had the temerity to suggest, “These ribs are so good, they don’t need no sauce!”